Import XML to Google Merchant Center to optimize Shopping campaigns
If you want to Import XML to GMC and feed optimized product attributes, this step-by-step guide walks you through the exact process. Follow these instructions to link your Clarmix account, add a supplemental XML feed, and configure segmentation so your Google Shopping campaigns get smarter data.
Table of Contents
- Why import an XML feed from Clarmix into Google Merchant Center?
- Quick overview: the steps we cover
- Step 1 — Create and copy the XML feed in Clarmix
- Step 2 — Add the XML as a supplemental data source in Google Merchant Center
- Step 3 — Verify products and Clarmix labels in Merchant Center
- Step 4 — Configure segmentation inside Clarmix
- Understanding conversion lag
- Finalise and save
- Tips to make the Import XML to GMC process smoother
- FAQ
- Credits
Why import an XML feed from Clarmix into Google Merchant Center?
Import XML to GMC lets you enrich your Merchant Center products with custom attributes (labels, price adjustments, profitability flags) that Clarmix calculates. These labels can be used to build smarter Shopping campaigns, refine bidding, and improve ROAS without manually editing thousands of SKUs.
What these fees allow you to do is the following:
1) Eliminate unprofitable products from your campaigns
Identify low performers and remove them to reduce costs. Boost efficiency by directing spend toward high-ROI products.
2) Scale up profitable products
Spot your best performers and invest more budget to maximize ROI. Drive higher revenue by doubling down on what works.
Quick overview: the steps we cover
- Generate and copy the XML feed URL in Clarmix
- Add that XML as a supplemental data source in Google Merchant Center
- Match it to your primary feed and schedule daily updates
- Confirm products are matched and see Clarmix labels in GMC
- Return to Clarmix and configure segmentation (time range, target ROAS, min spend, conversion lag)
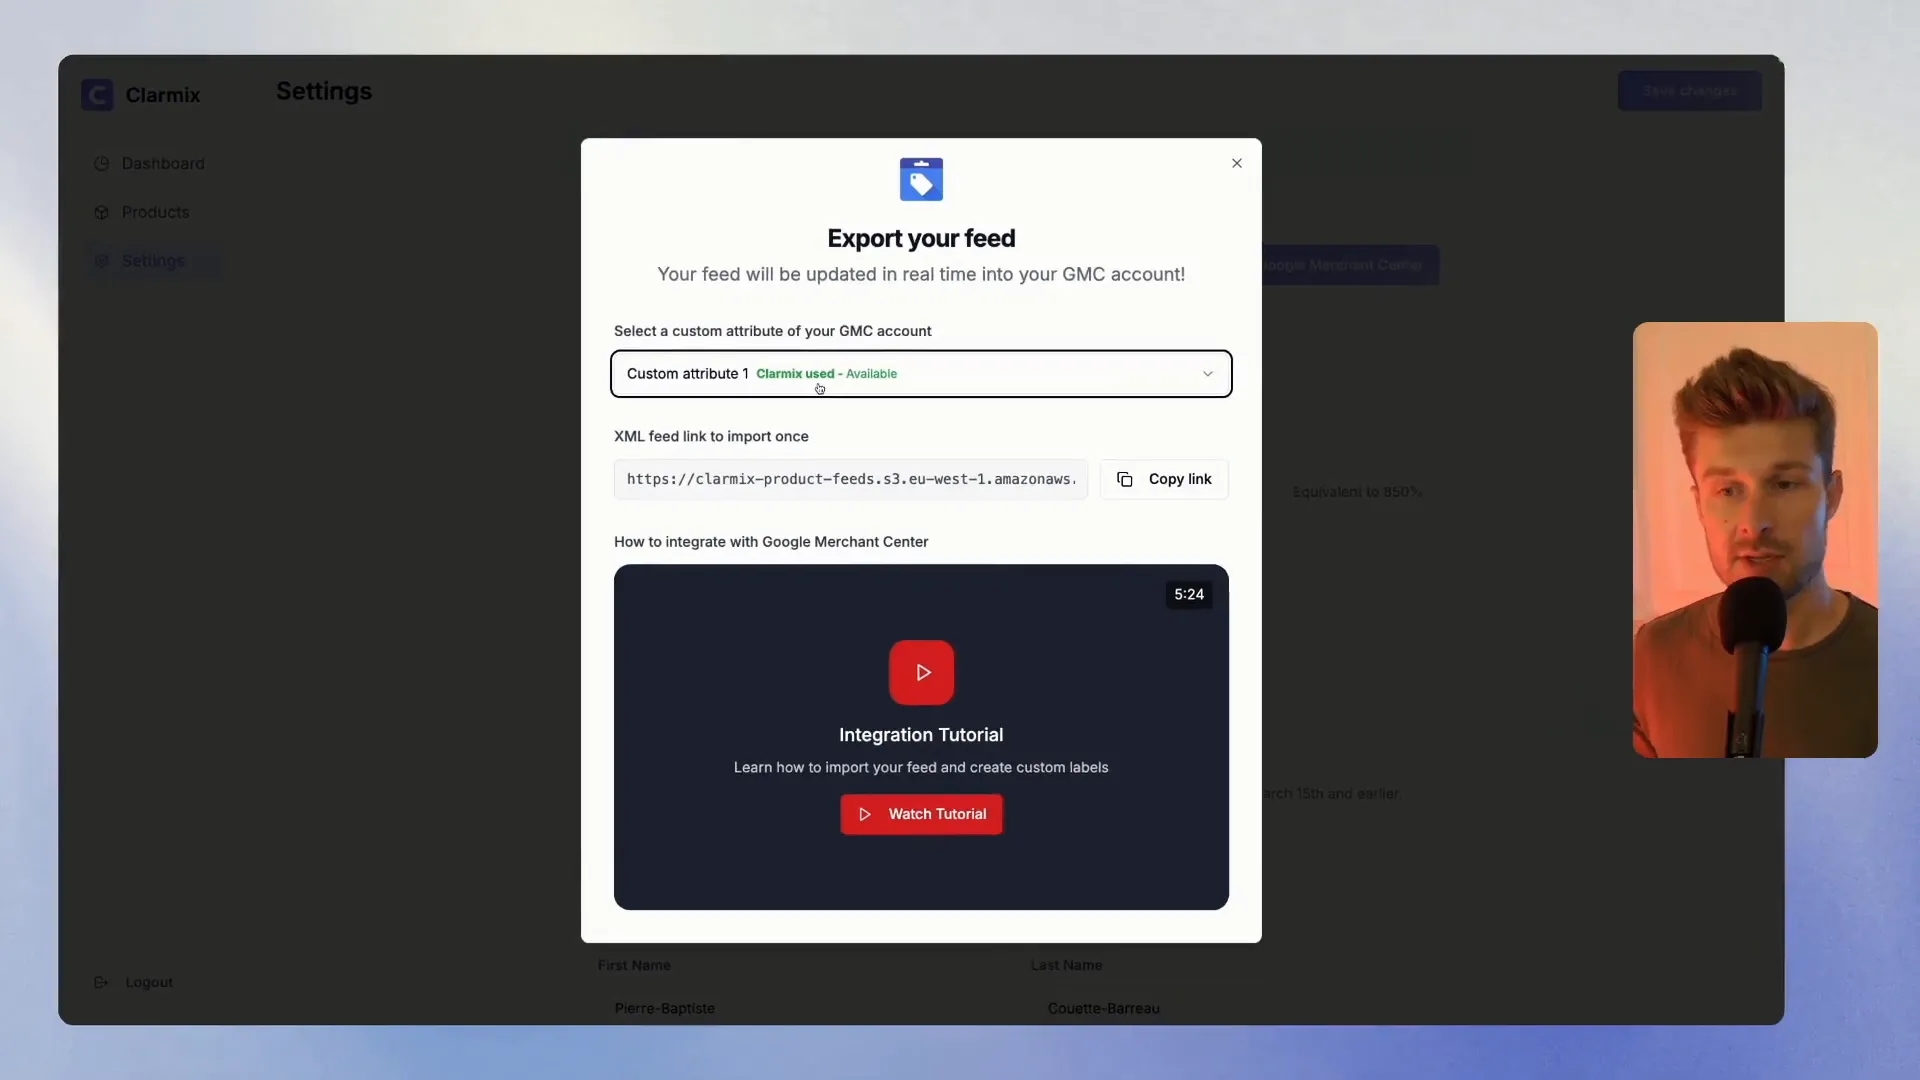
Step 1 — Create and copy the XML feed in Clarmix
Open your Clarmix dashboard and click the "Connect to Merchant Center" button in the interface. Select an unused custom attribute in your GMC setup (Clarmix will mark available attributes). Choose one (for example, "custom attribute 1") and copy the XML feed link Clarmix generates.
Step 2 — Add the XML as a supplemental data source in Google Merchant Center
Open Google Merchant Center → Data sources (top right). Go to Supplemental sources and click "Add a supplemental data source." Choose "Add product data from a file" and paste the XML link you copied from Clarmix.
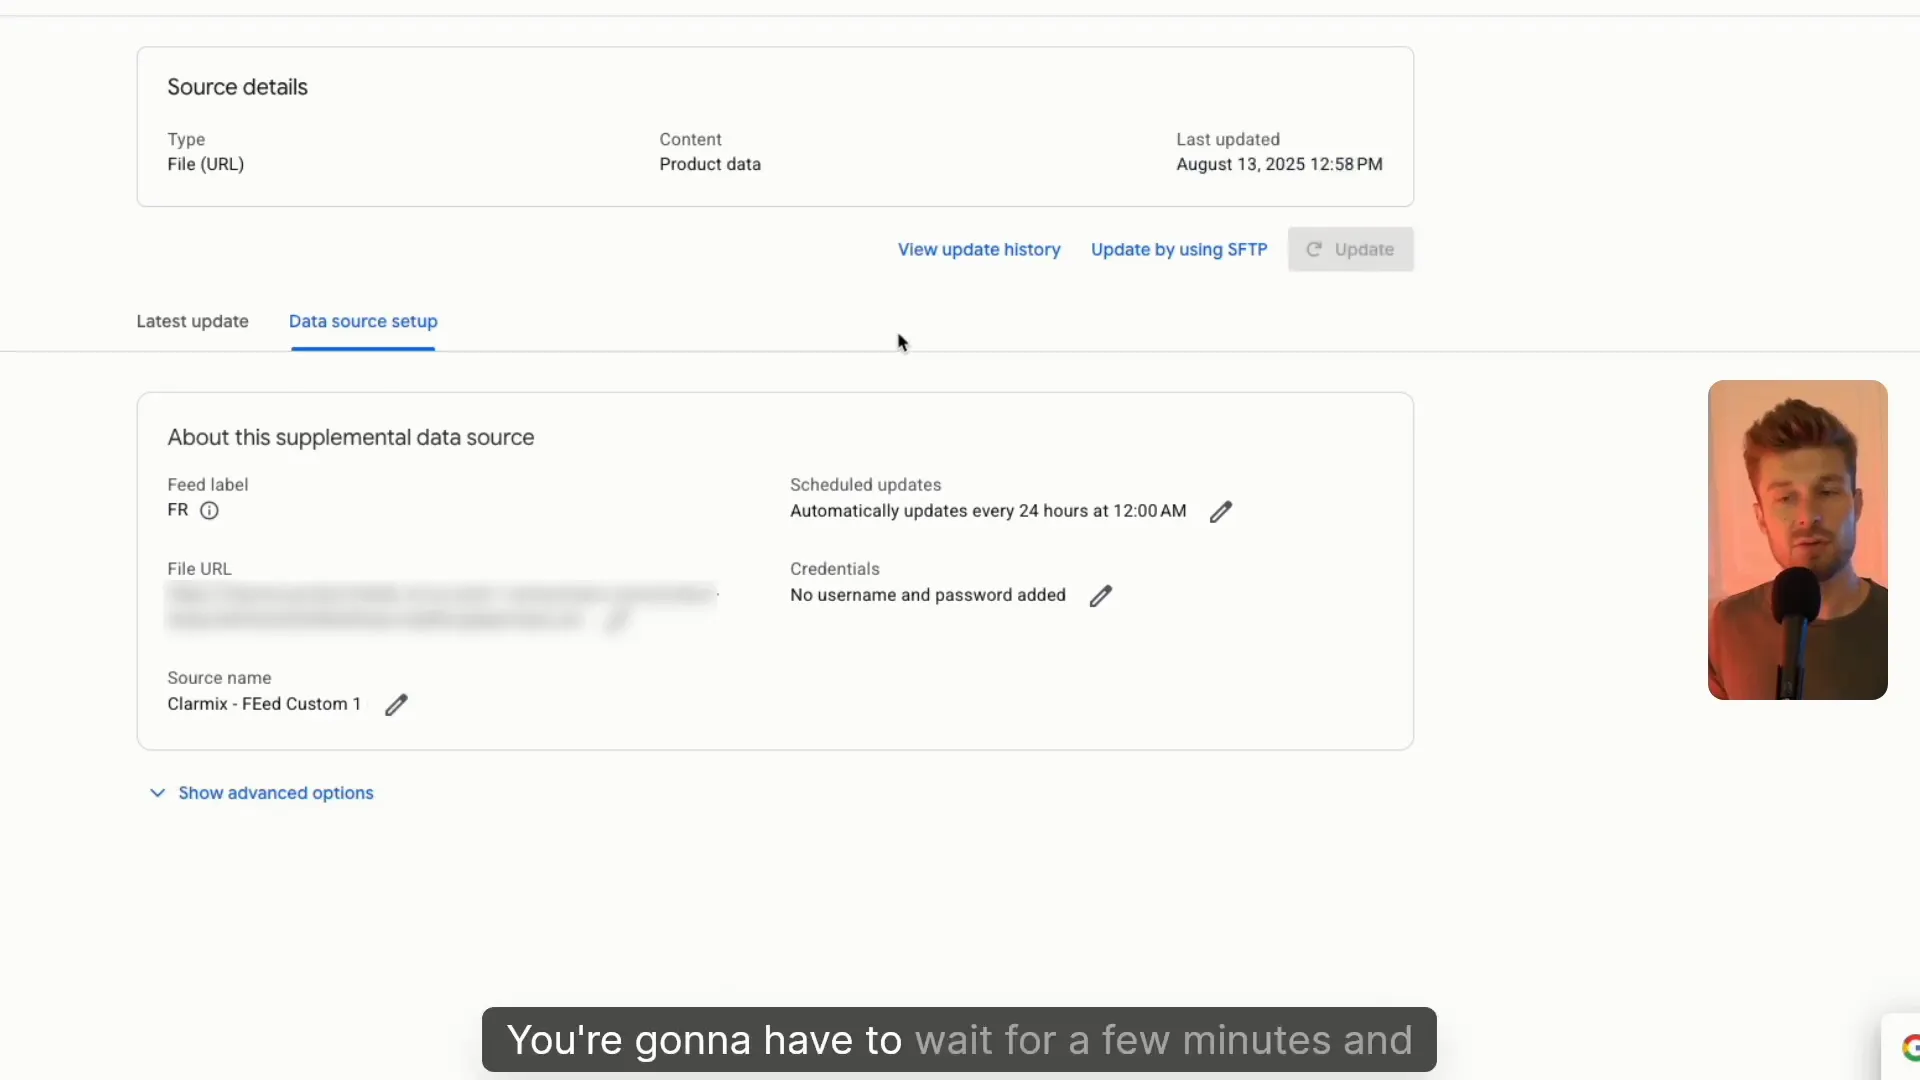
Set the schedule to automatically update every 24 hours (choose 12:00 AM or whatever suits you) so the supplemental feed stays fresh. Click Continue, select your primary product feed to match against, and create the data source.
Want to check how your Google Ads are performing? |
|
Analyse your Google Ads data for free, with not limitations! |
| Sign up for free |
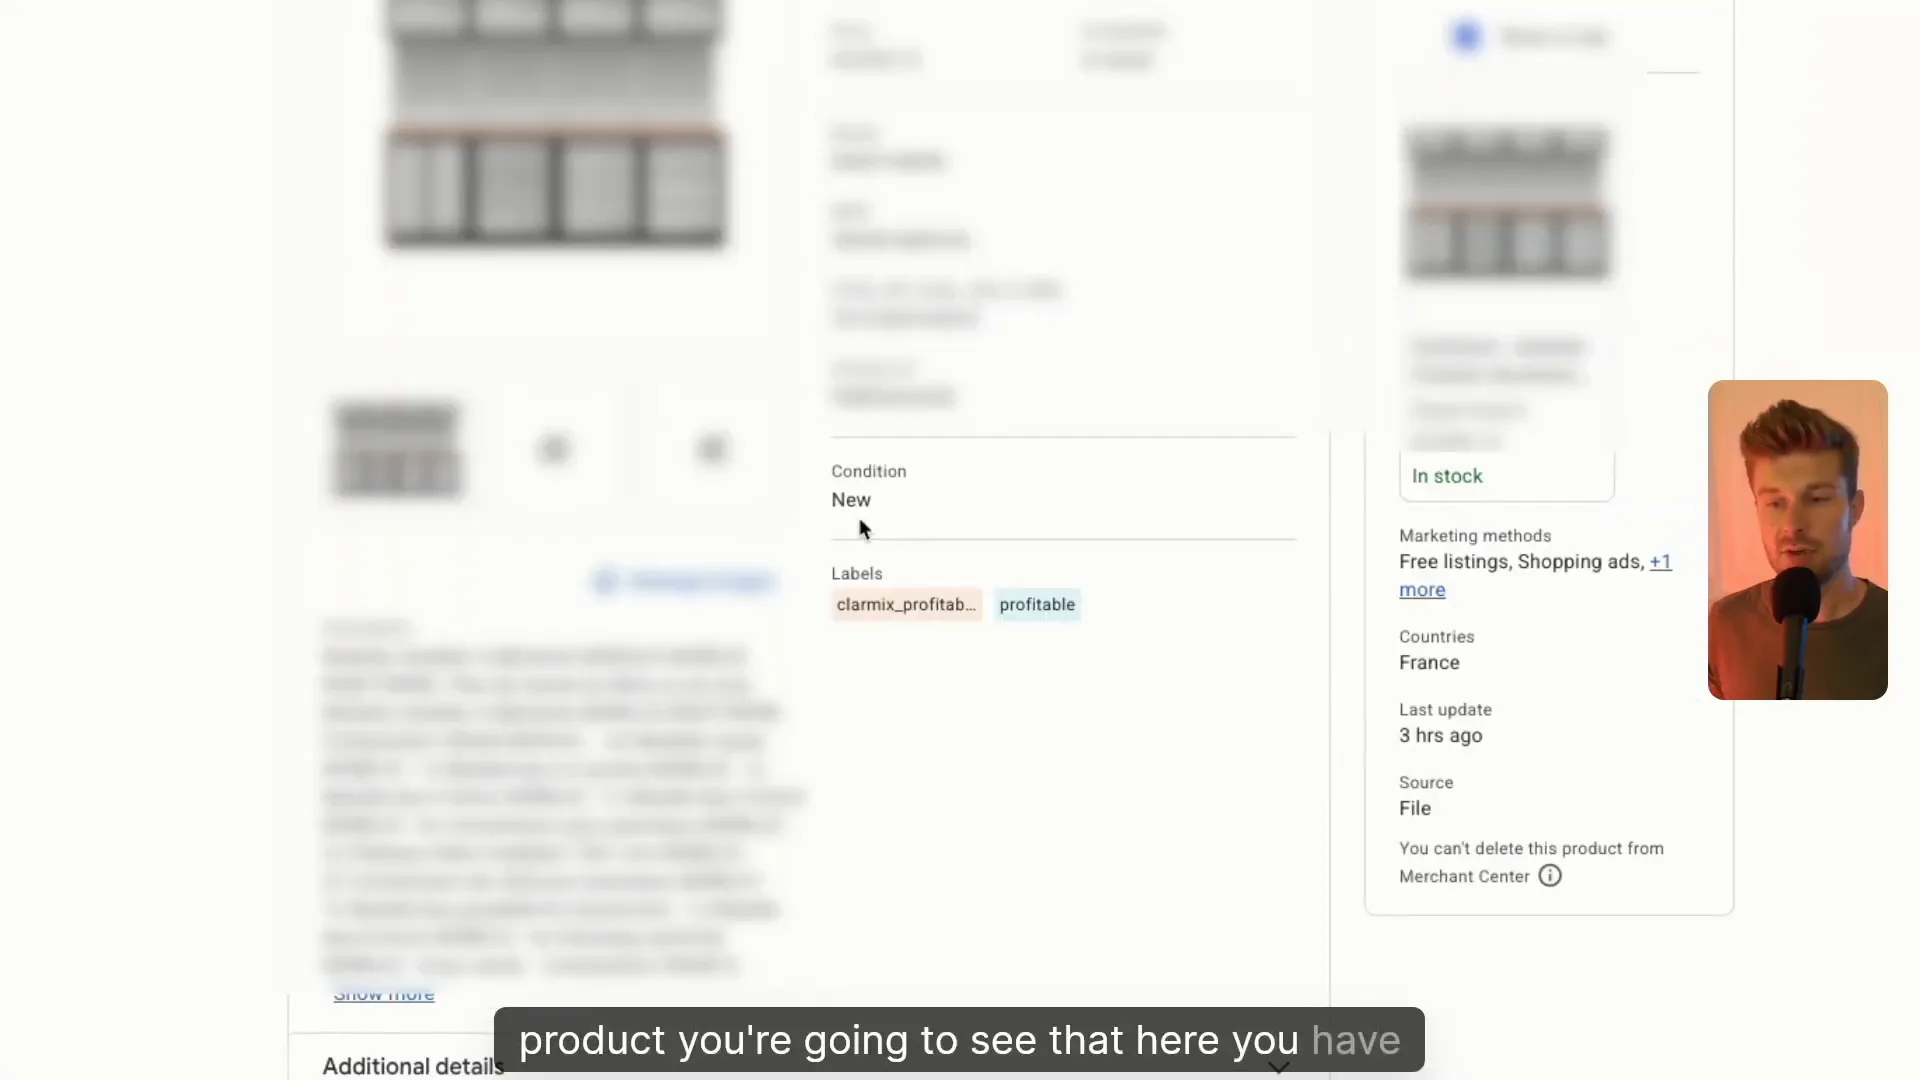
Step 3 — Verify products and Clarmix labels in Merchant Center
After creating the data source, wait a few minutes for processing. The Merchant Center will report how many products were updated and matched. Open a product in the Products tab to confirm you can see the custom Clarmix label applied (for example, a profitability tag).
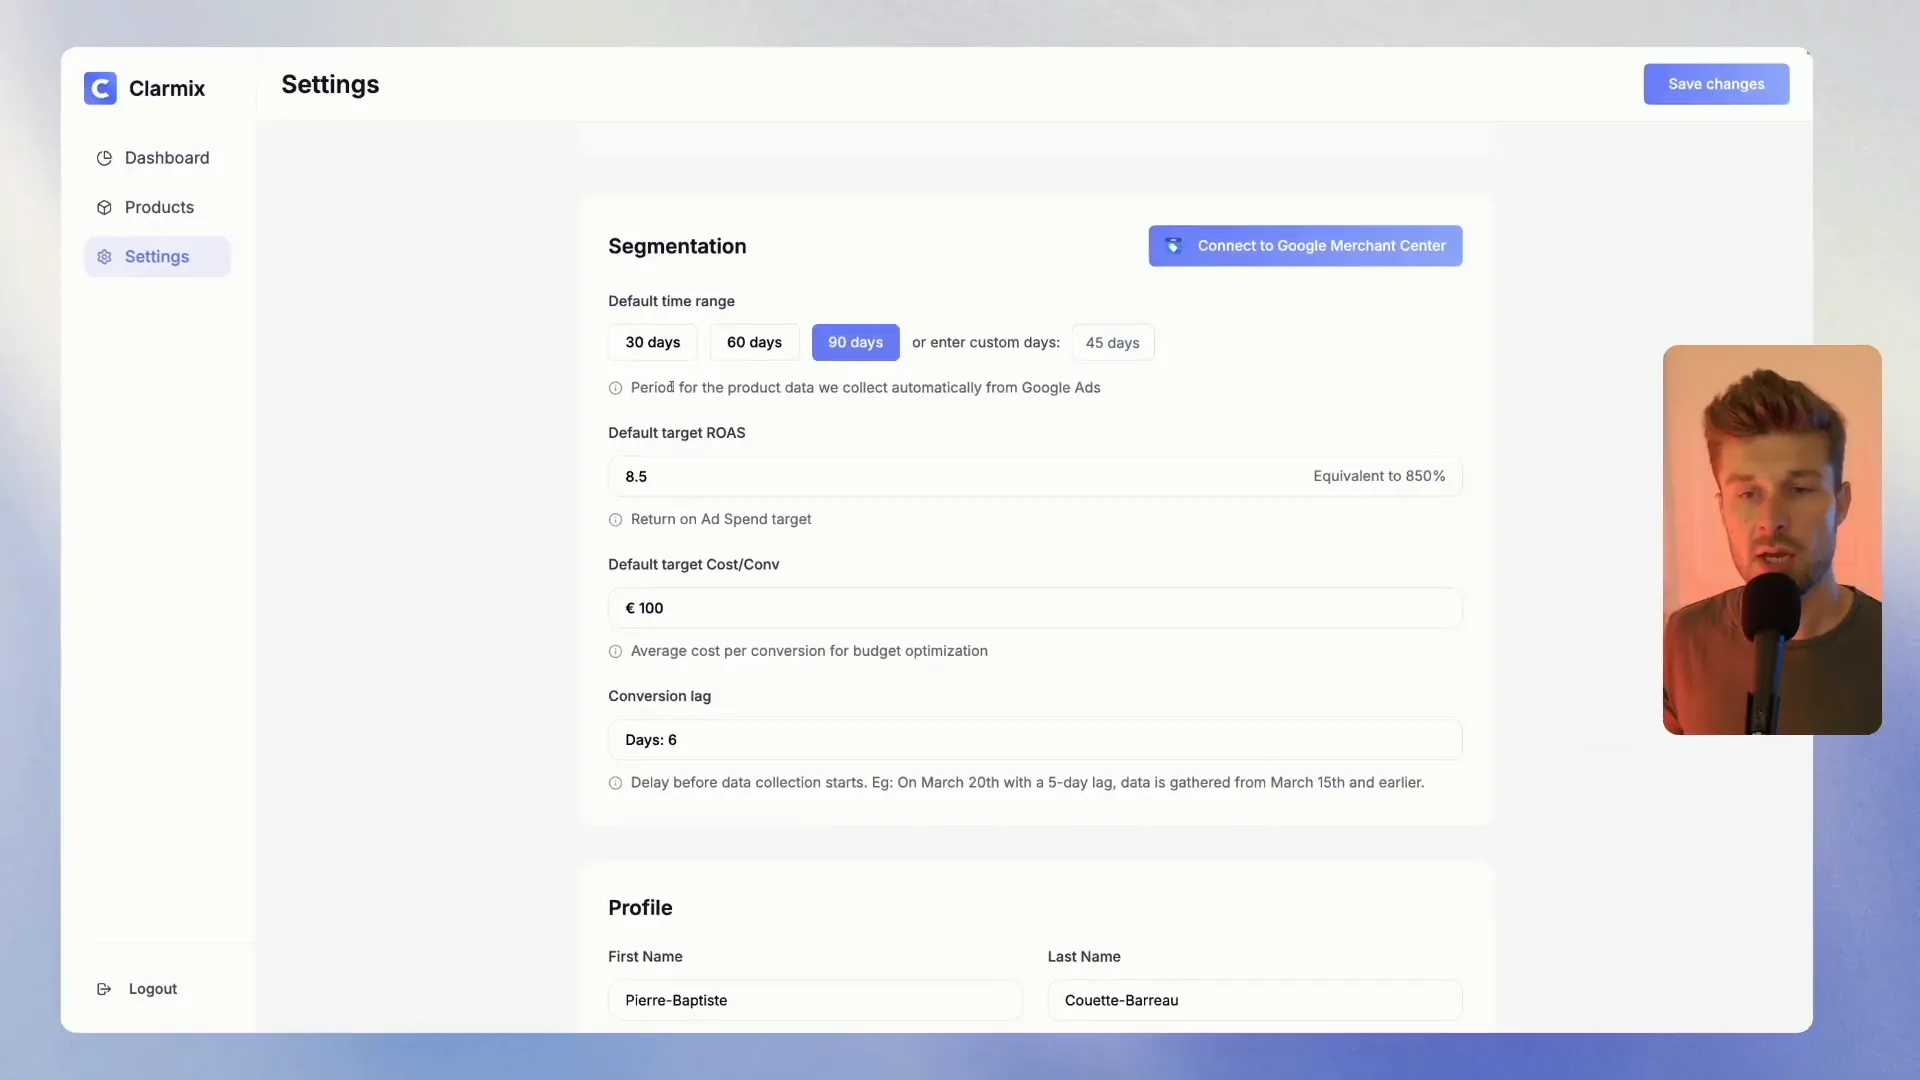
Step 4 — Configure segmentation inside Clarmix
Back in Clarmix, go to Settings → Segmentation. This is where you control which historical data Clarmix uses to calculate labels that feed into GMC.
- Select the time range: common options are 30, 60 or 90 days, or enter a custom period (e.g., 39 or 40 days).
- Set your target ROAS (Clarmix displays both ratio and percentage equivalents).
- Define a minimum spend threshold per product to ensure only statistically reliable items are considered (default example: €100, though you can use your average cost-per-conversion).
- Choose a conversion lag: this offsets the start of the data window to account for delayed conversions (see next point).
Understanding conversion lag
Conversion lag is the number of days you exclude at the end of your lookback window so conversions that occur after impressions are not counted incorrectly. In Google Ads, hover over the conversions column in your campaign to see the average conversion delay (for example, 5 days). If that value is 5, set a conversion lag of 5 days in Clarmix. This means a 90-day window will actually use data up to 6 days before today.
Finalise and save
When segmentation is set, click "Save changes" in Clarmix. Your Clarmix labels will continue to be pushed to Merchant Center via the daily-updated supplemental XML feed, and you can use them to improve bids, audiences, and campaign structure in Google Ads.
Tips to make the Import XML to GMC process smoother
- Use a dedicated custom attribute in GMC for Clarmix to avoid confusion with other feeds.
- Schedule the XML import at a quiet hour (e.g., 12 AM) to ensure updates and matching complete before peak bidding times.
- Set a sensible minimum spend per product so low-traffic SKUs don't produce noisy signals.
- Regularly review matched product counts in Merchant Center to spot mapping issues early.
FAQ
Q: Do I need a specific subscription level in Clarmix to export the XML?
A: Yes — ensure your Clarmix subscription includes the Merchant Center integration. The video demonstrates the flow after subscription features are active.
Q: Can the supplemental feed overwrite my primary feed attributes?
A: Supplemental feeds add or update specific attributes; they don’t replace the entire primary feed. Use a dedicated custom attribute in GMC for Clarmix values to keep data clean.
Q: How often should I schedule the XML import?
A: Daily updates (every 24 hours) are recommended so Clarmix labels remain current for bidding and segmentation.
Q: What should I set for minimum spend and conversion lag?
A: Use your historical average cost-per-conversion to set a minimum spend (the video example uses €100). For conversion lag, check the conversion delay in Google Ads and match that number in Clarmix.
Want to check how your Google Ads are performing? |
|
Analyse your Google Ads data for free, with not limitations! |
| Sign up for free |

