
If you run Google Ads on a tight budget (we define "small budget" as under $8,000/month), every euro or dollar must be allocated where it actually creates profit. This guide walks you through a turnkey strategy—using Clarmix + Google Merchant Center + Google Ads—to prioritize profitable and high-potential products automatically and keep the rest of your catalog live without wasting budget.
Table of Contents
- Summary
- Why this approach works for small budgets
- What you’ll build (campaign structure)
- Step-by-step setup
- Practical settings & tips
- What to expect after launch
- Conclusion
- FAQ
Summary
- Why: identify profitable products and stop funding loss-making SKUs.
- How: connect Clarmix to Merchant Center, push labels into your feed, then use those labels to build two Performance Max feed campaigns: one for profitable & high-potential products, another for the rest.
- Timeframe: set up in an hour; daily automatic updates afterwards. Expect a few hours for the first sync to populate Google Ads.
Why this approach works for small budgets
With limited ad spend, you can’t afford scattershot distribution across a large catalog. The goal is to:
- Concentrate spend on products that already show profitability or have clear high-potential signals.
- Keep exploration cheap by letting a second campaign serve the remaining catalog while excluding your best-sellers so they don't compete for budget.
- Automate this logic so it updates daily as Clarmix re-evaluates product performance.
What you’ll build (campaign structure)
- Performance Max (feed) #1 — only profitable & high-potential products (primary spend).
- Performance Max (feed) #2 — all other products except those in campaign #1 (low spend, catalog coverage).
- Branded Search & Shopping — optional additional campaigns for brand queries (not covered in depth here).
Step-by-step setup
1) Prepare Clarmix and decide the custom attribute
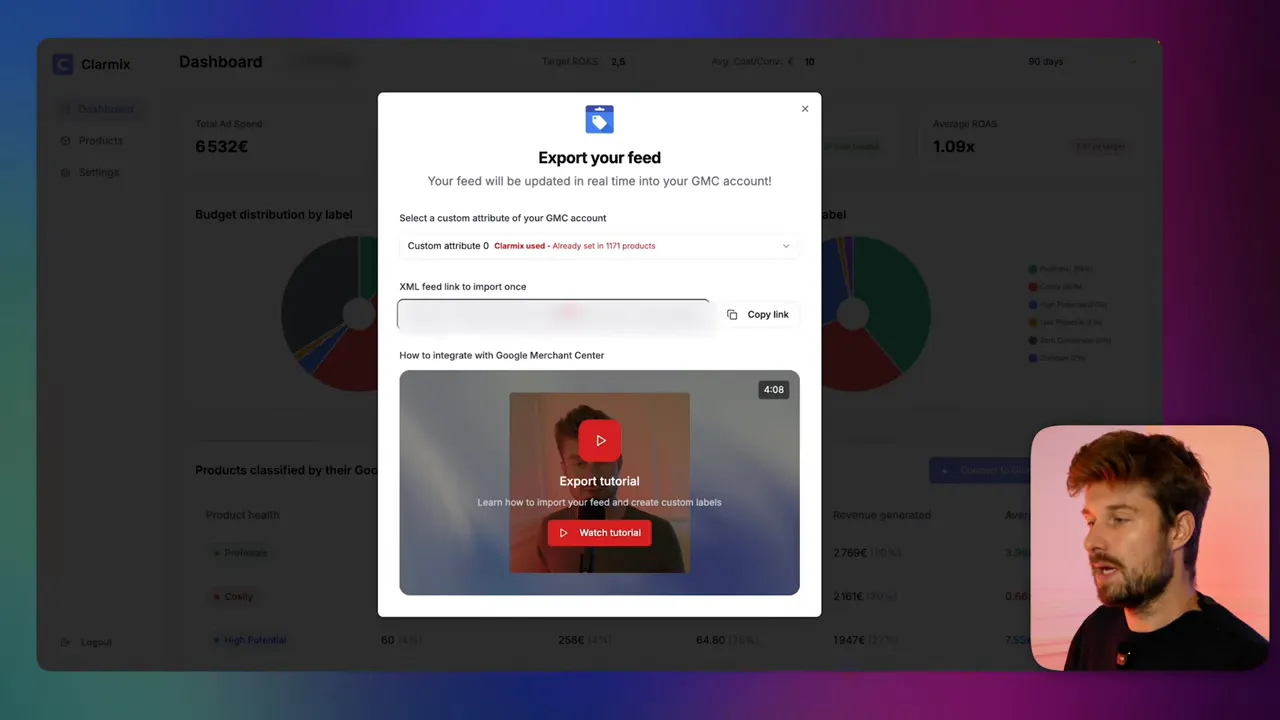
Sign up for Clarmix and choose a custom attribute slot in your feed (e.g., custom_label_0). Clarmix will provide a URL to an additional feed stream that contains its labels (profitable, high potential, costly, low potential, zero conversions, etc.).
Note: Clarmix becomes a paid feature when you connect it to Merchant Center; pricing depends on catalog size.
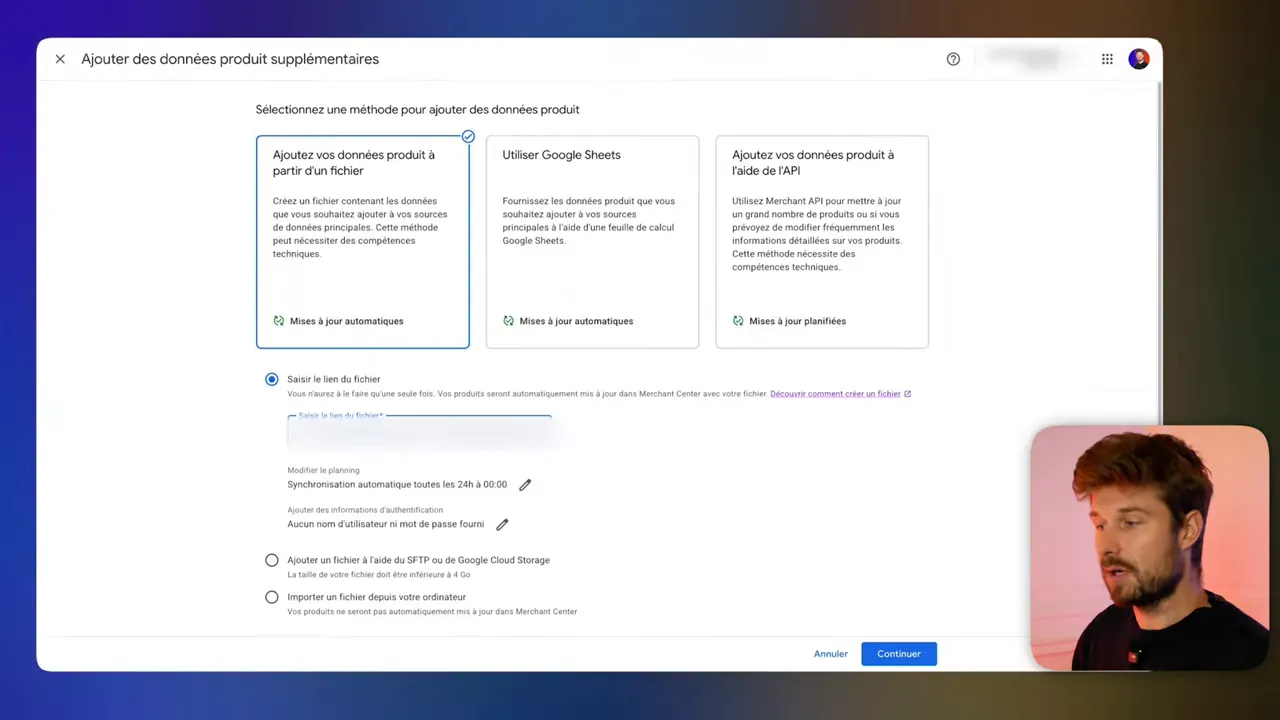
2) Add Clarmix as an additional data source in Google Merchant Center
- Go to Merchant Center → Data sources. Verify your main feed is correct and that Google hasn't auto-added products from your site (disable automatic inventory discovery if needed).
- If you don't see the "additional sources" option, enable the "Advanced data source management" add-on in Merchant Center settings → add-ons.
- Click Add additional product data and paste the Clarmix stream URL. Schedule a daily sync (example: daily at 6:00 AM Paris time).
- Choose your main data source (the one with your products) as the primary source for matching.
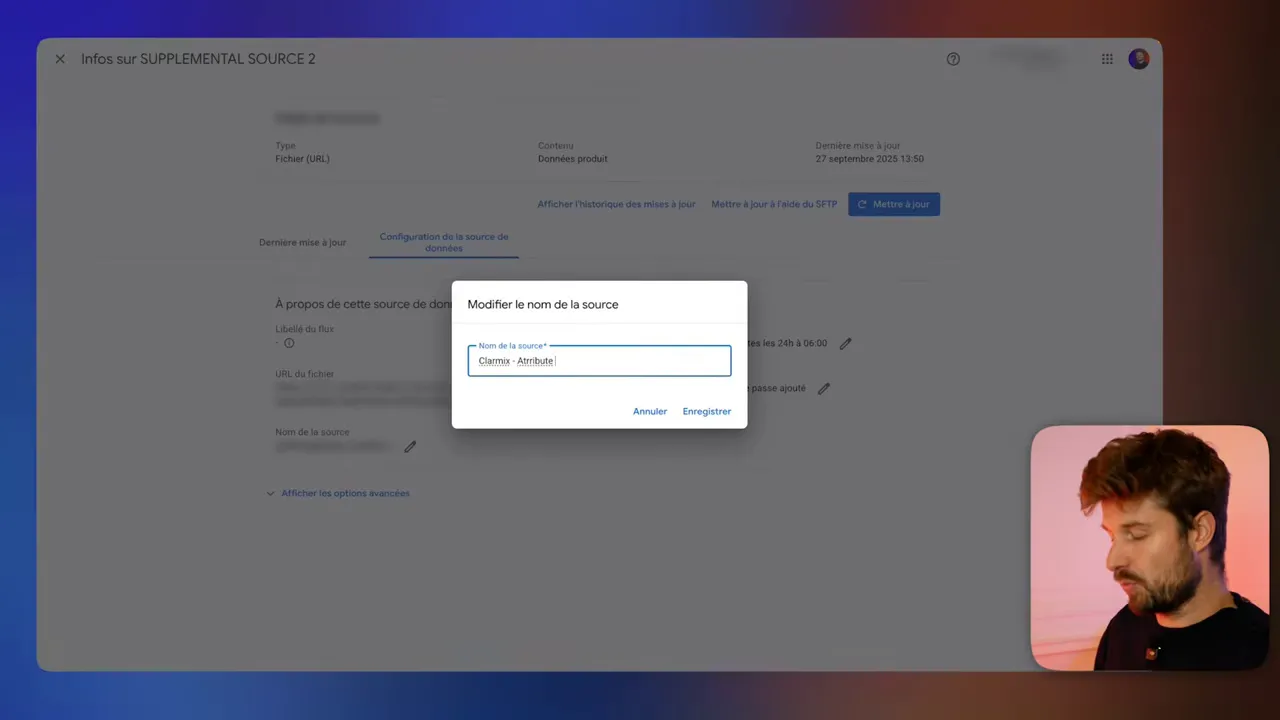
3) Name the supplemental source and set the attribute
After the supplemental source is created, open Source settings, rename it (e.g., "Clarmix") and specify which custom attribute you used (e.g., custom_label_0). Save and wait for the feed analysis to complete.
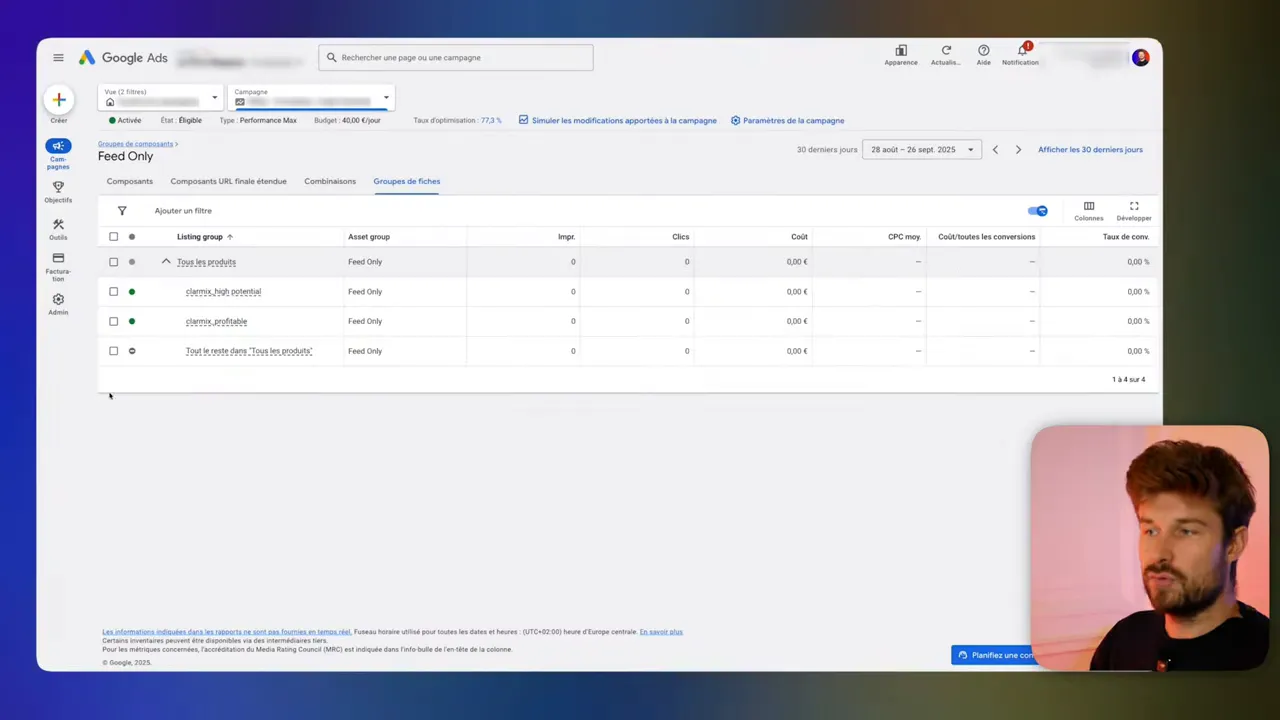
4) Check product labeling in Merchant Center
Open the Products tab and add the column for the custom attribute (custom_label_0). Each product will show a Clarmix label (profitable, high potential, costly, zero conversions, etc.). This labeling is automatic from Clarmix and will be updated daily.

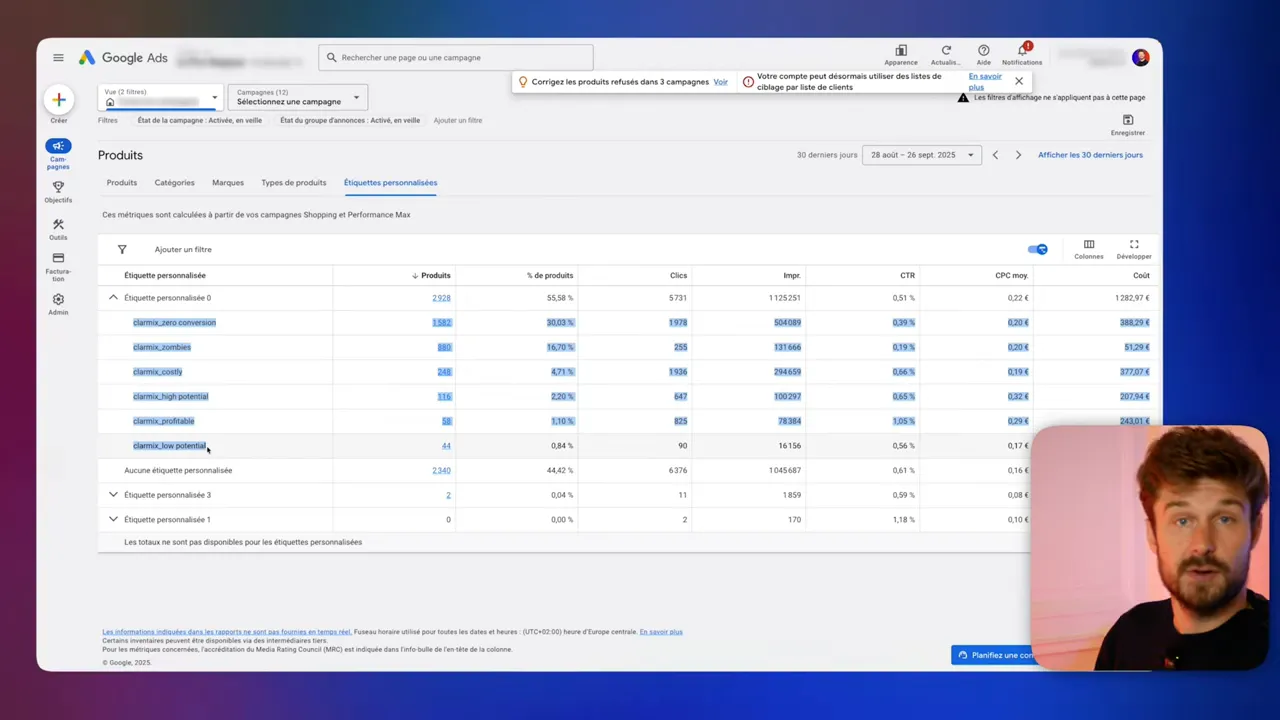
5) Wait for synchronization with Google Ads and verify labels there
Allow a few hours for Merchant Center data to sync into Google Ads. In Google Ads go to Campaigns → Products → Custom label → custom_label_0. You should see the same Clarmix labels and budget distribution metrics. This makes the labels actionable inside campaign/product group definitions.
6) Create Performance Max campaign #1 — profitable & high-potential only
- Create a new Performance Max (feed) campaign and give it a clear name (e.g., PMax - Feed - Profitable).
- When building the asset group, skip non-required feed text fields — you only need the product selection.
- Open the component (asset) group → Product selection → All products → Filter → Custom label → select the Clarmix labels "profitable" and "high potential". Save.
- Confirm that only those product subsets are included (they will appear green) and everything else is excluded (red).
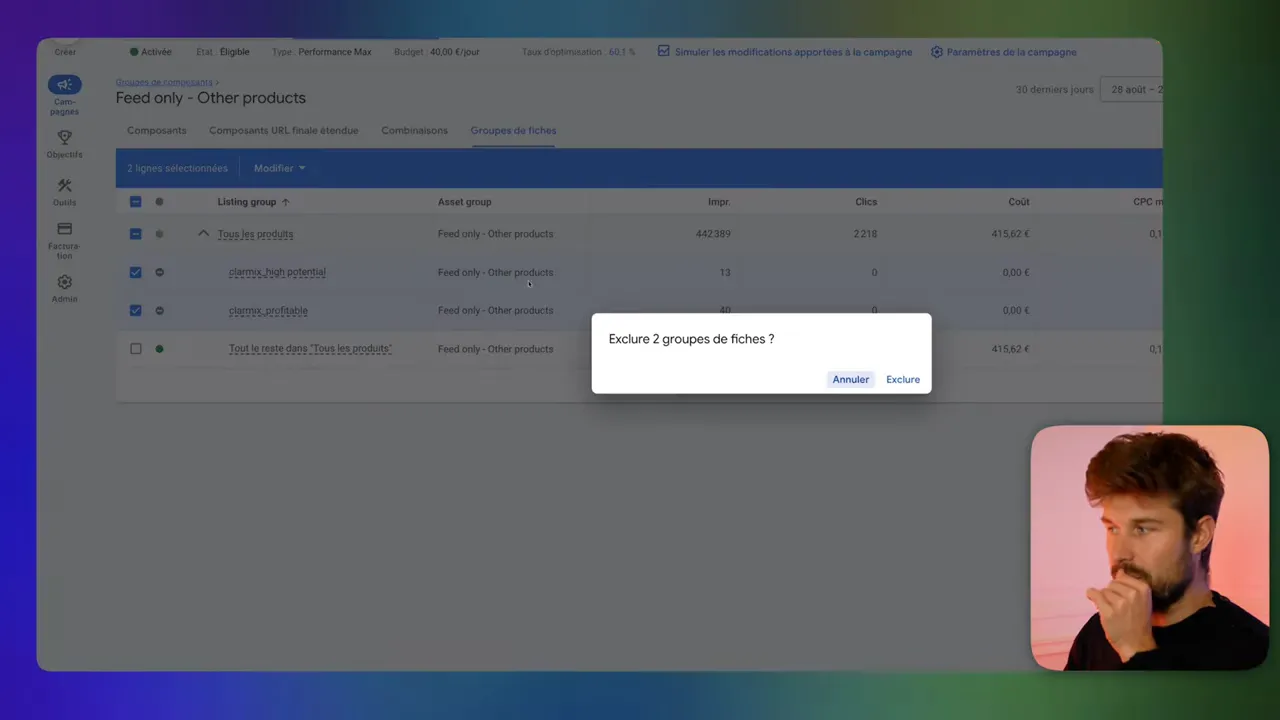
7) Create Performance Max campaign #2 — the rest of the catalog
- Create a second Performance Max (feed) campaign (e.g., PMax - Feed - Rest).
- In the asset group's product selection, add a filter to exclude the Clarmix labels "profitable" and "high potential".
- Leave the rest included. This ensures any unlabeled products (not yet analyzed by Clarmix) remain eligible and avoids accidentally blocking items from ever being shown.
- Keep a lower budget for this campaign so it provides catalog coverage and discovery without competing with your main profitable product campaign.
Practical settings & tips
- Bid & budget split: prioritize spend to campaign #1 (profitable/high-potential). On small budgets (<$8k/mo), focus >70% of paid search budget on that campaign if data supports it.
- ROS target & min spend: set realistic targets (example from the video: ROS 2.5 with minimum spend €10) and monitor actual performance by product.
- Allow the daily update to run: Clarmix updates the supplemental feed each day; the labels and campaign inclusions update automatically.
- Handle unlabeled SKUs: use the exclusion pattern in campaign #2 (exclude profitable & high potential) to include unlabeled items in the "rest" campaign so they don't get stranded.
- Don’t let Merchant Center auto-add products: disable automatic discovery so you control what data is in Merchant Center and what Clarmix tags.
- Cost: Clarmix requires a subscription once connected; cost depends on catalog size because of file processing.
What to expect after launch
Once setup is complete and daily syncs are running, Clarmix will relabel products based on new performance data. Your campaigns will adapt automatically: profitable products remain prioritized, newly profitable or high-potential SKUs can be promoted to the primary campaign, and underperformers naturally get less spend. This dynamic reallocation is critical for accounts with constrained budgets.
Conclusion
This is a simple, repeatable strategy for small-budget Google Ads accounts: connect Clarmix to Merchant Center, expose the Clarmix labels through a custom attribute, and use two Performance Max feed campaigns to separate your best products from the rest. It automates daily optimization and helps you scale without killing margin. If you manage ad spends below $8,000 per month, this approach helps you maximize every euro/dollar you send to Google Ads.
FAQ
How do I choose which custom attribute to use for Clarmix?
Pick any available custom_label slot (custom_label_0 through custom_label_4). Clarmix will detect which slots are free and recommend one. If custom_label_0 is free, it’s the simplest choice. Just make sure to set the same attribute when creating the supplemental source in Merchant Center.
How long does it take for Clarmix labels to appear in Google Ads?
After you add the supplemental feed in Merchant Center and name it, allow a few hours for the first sync. Daily updates occur on your scheduled time (e.g., 6:00 AM), and Google Ads will pick up the changes after Merchant Center finishes processing.
Does Clarmix cost extra?
Yes. Clarmix becomes a paid feature, starting at $29/month, when connected to Merchant Center. Pricing scales with catalog size because larger feeds require more processing.
What if some products are not labeled yet?
Keep them included in the second campaign by excluding only the profitable & high-potential labels. This ensures unlabeled or newly-added products can still get exposure and be evaluated by Clarmix over time.
What defines a "small budget" for this strategy?
For this article, a small budget is anything under $8,000 per month spent on Google Ads. The method works particularly well under this threshold, where prioritization is crucial.
Want to check how your Google Ads are performing? |
|
Analyse your Google Ads data for free, with not limitations! |
| Sign up for free |